Helm Crag & Gibson Knott
 |
| GPS Track |
Date: 16/06/2013
From: Grasmere
Parking: N/A
Start Point: Grasmere village
Region: Central Fells
Route length: 7.9 miles (12.7km)
Time taken: 04:04
Average speed: 1.9mph
Ascent: 635m
Descent: 635m
Wainwrights on this walk: Helm Crag (405m), Gibson Knott (422m)
Additional summits: None
Other points of interest: Dove Cottage
Route: Grasmere, White Crag, Helm Crag, Bracken Hause, Gibson Knott, Green Burn, Ghyll Foot, Thorny How, Goody Bridge
Helm Crag, one of the most famous peaks in the Lakes, mainly due to the variety of names attributed to its’s rocky summit. The most famous of these being ‘The Lion and the Lamb’ thanks to rocks on the summit resembling such when viewed from the right direction.
 |
| ‘The Lion and the Lamb’ sat atop Helm Crag |
The plan for this walk was to climb Helm Crag and continue along to ridge to the head of the valley before descending and walking back along Far Easedale Gill. We’d chosen Helm Crag as a starter because it would give us a nice warm up to a week or so of walking we’d be doing over the easter period and it’s a reasonably small mountain to start with.
The weather was also terrible, a classic mix of light persistent rain, heavy persistent rain, low cloud and a stiff breeze. No point being up in the high fells today. Starting from our rented cottage near to Dove Cottage on the edge of the village, we set off towards Grasmere.
 |
| Heading towards Helm Crag in the pouring rain |
Just after crossing Easedale Beck, we followed the lane that would take us to the foot of Helm Crag. The entrance to a bridleway beckons you to start the ascent. The path is wide but climbs at a fair rate made slightly more difficult by the wet weather.
 |
| Starting the ascent up the slippery path |
 |
| A view down the path as it passes under White Crag |
After a 200m yomp up the hillside, the path levels out onto a flat, grassy plateau. It was here that the rain really started to fall and I finally gave in a donned the waterproof trousers. The softshells I had been wearing had put up a decent fight but nothing more that a layer of plastic would keep this rain at bay. Despite the weather, there were still some impsing views down High Raven Crag. After dressing appropraitaly, we carried on as another 50m climb puts you onto the summit ridge.
 |
| The grassy area above High Raven Crag |
 |
| Looking down High Raven Crag |
 |
| Completing the final climb to the summit |
The summit of Helm Crag has some wonderful rock formations, non more so that the one that resembles ‘the lion’. It was too tantalising not to climb so Sara monkeyed up without much persuasion. Despite appearances, the summit of Helm Crag is actually a bit further along the ridge at the top of another rock often referred to as ‘The Howitzer’, for obvious reasons. By now, the clouds had dropped and any other views into either Easedale or Greenburn were obscured.
 |
| Sara conquers ‘The Lion’ |
 |
| ‘The Howitzer’ marks the summit of Helm Crag |
 |
| Unfortunately for us, most of the views were non-existent |
After passing Bracken Hause, we climbed the second Wainwright of the day, Gibson Knott. Gibson Knott is one of those oddities that were included in the Wainwright guide while actually appearing to be little more that a hump along the ridge. It’s interesting that some were chosen and some were not. The actually summit of Gibson Knott is debated but is thought to probably be the cairn on the most westerly outcrop.
 |
| Sara crosses Gibson Knott |
After Gibson Knott, we were faced with a very strong wind as it blew up the head of the valley. After seeking a bit of shelter for lunch, we tried to push on up to Calf Crag but decided that the rain, not being blown horizontal, and the wind were not making for a very pleasant walk. The decision was made to drop down into the shelter of Greenburn Bottom and make out way along the valley back to Grasmere.
 |
| The camera starts to suffer in the wet as we walk along the valley of Green Burn |
 |
| Sara crossing Green Burn which flows into the River Rothay |
After crossing the river, we made our way past Helmside to the road that leads back to Grasmere. In typical Lakeland fashion, the rain began to die away the moment we got back down to civilisation.
 |
| Walking towards Helmside |
 |
| The weather lifts as we reach Grasmere |
Call me strange but I quite enjoy walking in the rain, despite the difficulties. There were points on this walk though that were thoroughly unpleasant and, with this being at a lower level, it was a no-brainer to halt it before we got either too wet or blown away. It doesn’t matter how much waterprrof kit you’ve got on, that water will definately find a way in eventually.
I’ll definitely give this one another go though, hopefully when the weather’s a bit better.
Helvellyn via Striding Edge
 |
| GPS Track |
Date: 19/06/2010
From: Glenridding
Parking: Car park in Glenridding
Start Point: Glenridding
Region: Eastern Fells
Route length: 7.4 miles (11.9km)
Time taken: 04:55
Average speed: 1.5mph
Ascent: 828m
Descent: 828m
Wainwrights on this walk: Helvellyn (949m), Birkhouse Moor (718m)
Additional summits: None
Other points of interest: Striding Edge, Swirral Edge
Route: Glenridding, Mires Beck, Little Cove, Birkhouse Moor, Hole-in-the-Wall, Low Spying How, High Spying How, Striding Edge, Helvellyn, Swirral Edge, Red Tarn, Red Tarn Beck, Glenridding Beck, Greenside Road
Mine and Sara’s first real walk in the Lake District, and an ambitious one at that. We did this walk in the summer of 2010, not long after we had gained our real interest in walking. We were deciding what to do one free weekend when I caught my first glance of Striding Edge on the internet and that was it. The campsite was booked and off we went. What better introduction to the charms and excitement of the Lake District?
The Hlvellyn range is well served by a large car park in Glenridding and it was here we got out first taste of what to experience on Striding Edge. A sign very clearly stated that it should not be tackled in winter without full winter equipment and it’s not often you see that. Fortunately for us, it wasn’t winter. It was the middle of summer and one of those hot, clear days that are few and far between on our small island. Having got our stuff ready at the car, we started our way up out of the car park towards Mire Beck.
 |
| The footpath that climbs up alongside Mires Beck |
 |
| Sara surveys the ever increasing panorama of Ullswater as we climb |
The climb up the path is hard work, made doubly so thanks to the heat. Attacking Helvellyn is pretty challenging from all directions thanks to the direct nature of the paths that lead you to the summit. Nearing the top of Mires Beck, the path turns to the right before steep section that climbs onto Birkhouse Moor. Despite being an eastern ridge of Helvellyn, Wainwright affords it it’s own chapter making this (unknown at the time) the first Wainwright for the day at 718m.
 |
| The path up onto Birkhouse Moor |
It’s from Birkhouse Moor that you get the first view of Helvellyn and the two arêtes that guard the eastern approaches; Striding Edge and Swirral Edge. The path follows a south east heading as is descends a few metres before climbing back up to Hole-in-the-Wall, the beginning of Striding Edge though not the most exposed. Striding Edge is an incredible sight and might not appear that narrow in many of the pictures but that sensation disappears as you stand between two quite imposing drops. The best view along the ridge is from High Spying How (the highest point at 863m), about half way between Hole-in-the-Wall and the final scramble up on to the summit. It is here that the ridge becomes particularly narrow and steep sided.
 |
| Helvellyn and Red Tarn from Hole-in-the-Wall, the start of Striding Edge |
 |
| Striding Edge and Helvellyn from High Spying How |
 |
| Panorama from Striding Edge including Helvellyn, Swirral Edge, Catstye Cam and High Spying How |
 |
| Looking back along Striding Edge from the top of The Chimney |
As you can see from the pictures, strolling across the very top of the ridge is not for the faint hearted but can be avoided if desired by following the path below on the northern side of arête. The final part of Striding Edge requires a scramble down The Chimney, a large column of rock that stands between you and the scramble up Helvellyn. Sara and I had no trouble monkeying down but, again, it can be avoided by following a path to the south this time.
 |
| Sara at the foot of The Chimney. Looks are deceiving though as it is much higher |
Following The Chimney is the steepest part of the walk, a scramble up onto the summit plateau.
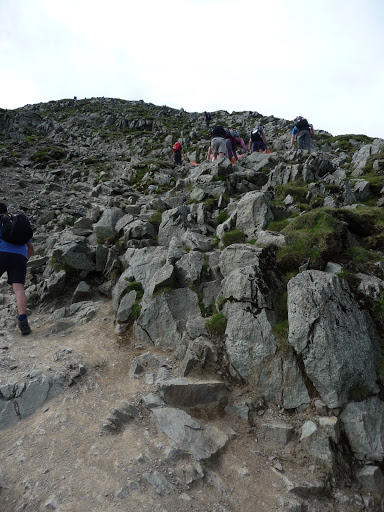 |
| Looking up the scramble that takes you onto Helvellyn |
 |
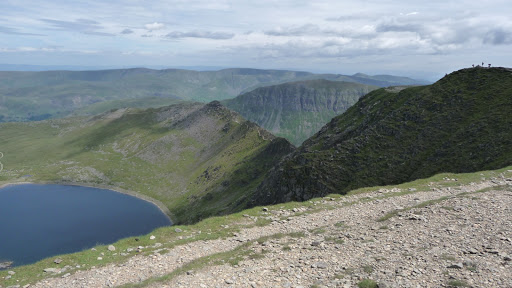
| Taking a break offers a fine view of Striding Edge, The Chimney is the second rocky mound on the ridge |
A large cairn marks the top of the scramble and the start of the large, flat summit of Helvellyn. The third highest peak in England at 950m, Helvellyn is a magnificent mountain, mainly due to the excitement of it’s many approaches. It’s suggested that it’s name derives from the Cumbric words “hal” (moor) and “velyn” (yellow). Sara and I spent some time on the summit soaking in the views before starting the descent back down Swirral Edge.
 |
| The summit of Helvellyn |
 |
| At the top! |
 |
| Striding Edge as viewed from Helvellyn. The height difference between Striding Edge and the summit can clearly be seen |
 |
| Sara admires the scenery. Catstye Cam is the pyramid-shaped mountain in the background |
Swirral Edge offers a similar experience as Striding Edge but is much shorter and I got the feeling it was less exposed. This may be due to the fact there’s no real path to follow as you pick your way carefully down the rocks. Like Striding Edge though, Swirral Edge is a notorious area of accidents so care should be administered at all times when climbing or descending it.
 |
| On Swirral Edge looking towards Catstye Cam |
 |
| Striding Edge including High Spying How and The Chimney |
After reaching the bottom of Swirral Edge, we passed on the opportunity of climbing Catstye Cam and made our way down to Red Tarn for a quick break and to dip our feet in the cool water. It was a welcome relief to what had become a very hot day. You can see from the views of Striding Edge above, the sides aren’t as steep as they appear when you’re stood on top of it.
 |
| On the shores of Red Tarn |
The path that returns you to Glenridding follows the route of Red Tarn Beck underneath the eastern flanks of Catstye Cam and down to Greenside mines. The mines have an interesting history, particularly in the 1950s where the Atomic Weapon Research Establishment wanted to use the lower levels to test their seismic instruments using large explosions. The experiments were short lived. You can read all about it here.
 |
| Red Tarn Beck |
 |
| Birkhouse Moor from Greenside Road |
From Greenside mine, all that is left is a yomp along Greenside Road back into Glenridding.
It might have been a tad ambitious tackling Striding Edge and Helvellyn as a relative novice but it was definitely worth any apprehension I experienced. It’s a real adventure, especially for first timers and one I wouldn’t hesitate to do again. As with many walks in the Lakes I’d avoid it if the weather was poor (unless of course you are confident and well equipped). There are slightly less adventurous ways to the summit of Helvellyn (from Glenridding) but these require a much longer walk to get up onto the ridge. However, it would be a real shame to miss Striding Edge without at least getting to the Hole-in-the-Wall and seeing it for yourself.
